
Racking Components
Need a Annual Racking Inspection by our SEMA Approved Racking Inspectors? Trust A-Z Rack Inspections Ltd - Call 07917 664940 or 07947 886161 today!!
Understanding Racking Components
Your Guide to Pallet Racking Parts, Their Purpose & Safety Importance
At A-Z Rack Inspections Ltd, we believe that the foundation of racking safety is understanding your equipment. Whether you're managing a warehouse, preparing for a SEMA-approved inspection, or expanding your storage layout, knowing the key components of your racking system can make all the difference in maintaining compliance, preventing damage, and avoiding costly downtime.
Let’s take a closer look at the key components...
What Makes Up a Racking System?
Pallet racking systems are built from several structural and safety-critical components. Each part plays a vital role in carrying loads, maintaining stability, and ensuring your system complies with HSE and SEMA safety standards.
Key Racking Components Explained
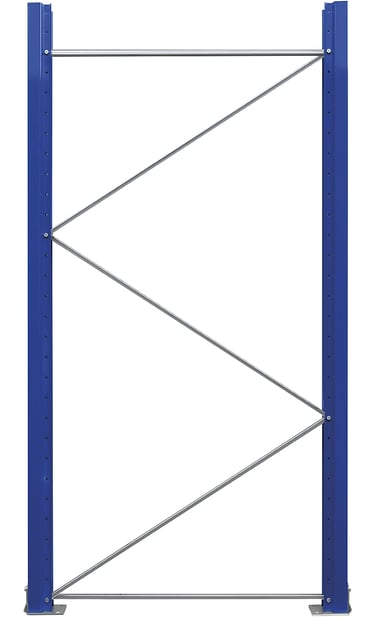
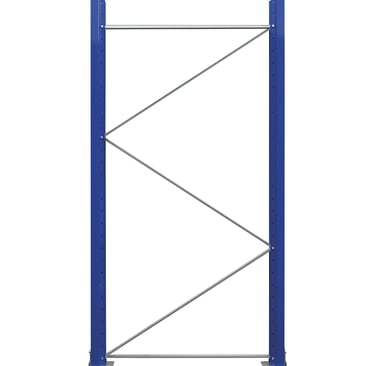
Pallet Racking Frames
Racking frames consist of front and rear vertical uprights connected by horizontal and diagonal bracing. Each upright sits on a baseplate, which transfers the load to the warehouse floor and allows secure mechanical fixing.
Available in various depths (commonly 900mm and 1100mm)
Frame depth is selected based on your pallet size
Uprights are slotted or louvred to receive horizontal beams
Bracing ensures rigidity and vertical alignment
Inspection Tip: Bent or twisted uprights and damaged frame bracing, especially at lower levels, can compromise structural integrity and are frequently flagged in inspections.
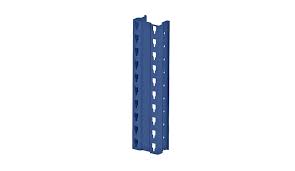
Racking Uprights
Engineered for Vertical Load-Bearing
Each upright is a cold-rolled steel profile designed for high vertical strength. Different manufacturers offer various “duty” ratings, which are usually stamped on the upright face. Uprights must be selected based on anticipated bay and beam loads.
Slots or holes for beam connection
May include design-specific profiles depending on load capacity
Critical to system strength and stability
Compliance Note: Always verify that uprights are rated for your specific loading requirements to ensure safety and avoid non-conformance.
Frame Bracing
Structural Support Between Uprights
Bracing links the uprights together to form a strong, square, and rigid frame. It helps distribute vertical and lateral loads to the ground and absorbs minor impact from warehouse machinery.
Typically bolted between uprights
Can be replaced if damaged
Crucial to load transfer and frame alignment
Watch For: Lower-level bracing damage is more serious due to the higher load concentration in these areas.
Beams
Where the Pallets Sit
Beams span the distance between two uprights and hold the palletised goods. They come in different lengths and profiles to support various load capacities.
Common sizes: 2250mm, 2700mm and 3300mm
Profiles include box section, open section, or RSJ
Rated to specific pallet weights
Remember: Not all beams are rated equally — always check the beam load rating before storing goods.
Baseplates
Secure Anchoring for Uprights
Baseplates are welded or bolted to each upright and then fixed to the floor slab. They provide stability and distribute the upright’s load into the warehouse floor.
Typically fixed with at least one floor anchor
Design may vary by racking type (e.g., VNA or drive-in racking)
Misalignment or damage can compromise the whole structure
Fix It: Damaged or corroded baseplates should be replaced promptly. Floor fixings must be tight and intact to ensure full load transfer.
Floor Fixings
Anchoring the Rack to the Floor
Floor fixings (also called anchors) secure baseplates to the warehouse floor. They are engineered to resist both vertical (tension) and horizontal (shear) forces.
Typically 1 per upright, but can vary
Designed to handle 5kN in shear, 3kN in tension
Must be correctly rated and properly installed
Inspection Alert: Loose or missing floor fixings are a common compliance failure and must be addressed immediately.
Racking Beam Safety Locks
Small but Critical for Safety
Safety locks prevent beams from being accidentally dislodged due to vibrations or minor impacts. They’re a low-cost but vital component of any racking system.
Manufacturer-specific designs (plastic or metal)
One lock should be fitted at each beam end
Must be intact and correctly fitted
Critical Detail: Missing or incorrect beam safety locks are a red risk in SEMA inspections. If unsure, send us a photo — we’ll help you identify the correct part.
Racking Load Notices
Legally Required and Highly Important
Load notices display essential safety and compliance data. These include the maximum safe working loads (SWLs), beam spacing, installation date, and supplier traceability.
Must be updated if the system is reconfigured
Required under SEMA and HSE guidelines
Essential for training, inspections, and day-to-day reference
Compliance Must-Have: Every racking bay must have a valid, legible, and up-to-date load notice.
Racking Protection
Minimising Impact Damage
Rack protectors are physical barriers fitted to uprights, end frames, and aisle entrances to help guard against forklift impact.
Available as column guards, end-of-aisle barriers, or full-frame protection
Especially important in high-traffic zones
Advised in HSE’s HSG76 safety guide
Best Practice: Racking protection should complement good driver training and layout design, not replace them.

✅ SEMA Damage Classifications Explained
At A-Z Rack Inspections Ltd, we follow the official SEMA (Storage Equipment Manufacturers’ Association) traffic light risk classification system to assess and report racking damage during inspections. This widely recognised system categorises the severity of damage to ensure that warehouse racking remains safe, compliant, and fit for purpose.
Understanding each classification is essential for making informed decisions about when and how to take action following a racking inspection.
If any component of your racking system—such as an upright, bracing, or beam—shows damage that exceeds double the acceptable SEMA limits, it is classified as Red Risk. This damage is considered critically unsafe, with a high potential for collapse or failure.
Action required:
The affected area must be immediately offloaded and isolated.
No loads should be placed back on the structure until repairs have been completed by a competent person or racking specialist.
Red Risk = Immediate danger. Do not delay.
Amber risk damage indicates that a component has been damaged beyond SEMA's allowable limits, but not severely enough to require immediate offloading. However, it still presents a significant hazard and must be addressed.
Action required:
The affected area must be monitored and noted.
No new pallets or loads should be placed in the damaged bay.
The issue must be repaired within 4 weeks.
If the repair is not completed in time, it is automatically reclassified as Red Risk.
Amber Risk = Dangerous if ignored. Schedule repair without delay.
Green risk areas show minor damage that is still within SEMA’s permissible limits. While no immediate action is required, the affected components must be monitored and reviewed during the next scheduled inspection.
Action required:
No repairs needed at this stage.
Document the damage for future reference.
Reassess during the next inspection or sooner if the damage worsens.
Green Risk = Safe for now, but stay vigilant.
Red Risk
Amber Risk
Green Risk
A-Z Rack Inspections Ltd:
Keepers Cottage, Groes Farm, Rhosesmor Road, Northop, Mold, Flintshire, CH7 6AG
Email: sales@a-zrackinspections.co.uk
Tel: 07917 66 4940
Tel: 07947 88 6161
Quick Links:
Rack Inspections
Racking Inspection Quote
Copyright © 2026 A-Z Rack Inspections Ltd
Registered Company number: 13065668 | VAT Registered: GB 367 4452 73